Key Manager Server Setup
This section provides instructions for installing and configuring a Key Manager Server, and can be used to set up a Key Manager Server that runs both the frontend: and the backend: services, or only one of them.
Sub-sections that are necessary only for setting up either of the services are marked with Back End Only or Front End Only respectively.
-
To set up a dedicated front end or back end (recommended in production-environment deployments), execute the commands in the sub-sections that are platform-independent, and execute the commands that are specific to the current component. Skip the sub-sections that are specific to other components. For example, when installing a stand-alone back end, skip the sections marked with Front End Only.
-
To set up a combined front-end/back-end machine, execute the steps in all the sub-sections.
Installing Support Packages
Install the support packages required to run Key Manager:
-
Navigate to the directory where the Key Manager installation package is located. Extract the Key Manager installation package using the following command:
# tar -xvf sshmgr-7.0.0-*.x86_64.tarThis extracts the installation package to the current working directory.
-
Navigate to the installation package directory that was created by extracting the tar file:
# cd sshmgr-7.0.0-*/The instructions are provided with the assumption that the commands are run from this path.
-
Install the OS-specific support packages required by Key Manager. The required packages differ depending on the OS version on which you are installing Key Manager:
-
For Red Hat 8.x / Rocky Linux 8.4 installations, install the following support packages:
# yum install os-support/rhel8/*.rpm -
For Red Hat 9.x / Rocky Linux 9.x / Amazon Linux 2023 installations, install the following support packages:
# yum install os-support/rhel9/*.rpmIf you're planning to use Key Manager with an Oracle database, also install:
# yum install libnsl -
For Red Hat 10.x installations, install the following support packages:
# yum install os-support/rhel10/*.rpmIf If you're planning to use Key Manager with an Oracle database, also install:
# yum install libnsl
-
If some of the support packages could not be installed due to conflicts, you must remove the conflicting packages, then try again to install the missing support packages.
OpenSSH Server Configuration
The Key Manager back end requires a Tectia SSH Server running and listening on port 22. This port is by default reserved by OpenSSH server. In such cases, you must free port 22 by configuring OpenSSH server to run under a different port. Additionally, you must configure OpenSSH server to ignore Key Manager agent connections, which must be handled by Tectia SSH Server instead.
Configure OpenSSH as follows:
-
The OpenSSH port is indicated in the OpenSSH server configuration file
/etc/ssh/sshd_configwith a line like the following:# Port 22Uncomment the line by removing its leading
#character, and replace the port number with another value of your choosing (for example, the port can be changed to 222 by changing the line toPort 222). -
Disallow the Key Manager agent user
sshmgrfrom connecting to the host via OpenSSH server. To do this, find the line in the OpenSSH server configuration file that begins withDenyUsers, and appendsshmgrto it.If there is no line in the OpenSSH server configuration file that starts with
DenyUsers, deny thesshmgruser by appending the following line to the file:DenyUsers sshmgrSave your changes to the file.
-
Install the SELinux management tools (if they have not been installed already):
# yum install policycoreutils-python-utils -
Add the new OpenSSH port to the list of acceptable ports in SELinux (in this example, port 222):
# semanage port -a -t ssh_port_t -p tcp 222 -
Restart OpenSSH server:
# service sshd restart -
Optional: You can run the following command to verify that OpenSSH server is listening on the new port (substitute 222 with your chosen port number):
# ss -an | grep 222 -
To allow OpenSSH server on the new port, that port must be allowed by the firewall.
Allow the new OpenSSH port using the firewalld Firewall Manager (substitute 222 with your chosen port number):
# firewall-cmd --add-port=222/tcp --permanent# firewall-cmd --reloadnoteAmazon Linux 2023 doesn't come with firewalld by default. You will need to use other means (such as AWS security groups) for port management.
OpenSSH server should now function under the new port.
Installing and Configuring Tectia SSH Server
After making sure that no applications are using port 22, install Tectia SSH Server according to the following instructions:
-
Install the Tectia SSH Server packages:
# yum install ssh-tectia-server/*.rpmThe The bundled Tectia SSH Server is equipped with an evaluation license, which is valid for 45 days. A commercial license is required for prolonged use.
-
To activate the Tectia SSH Server, copy the Tectia SSH Server license key to the license folder (substitute path/to/tectia-server-license.dat with the path of your Tectia SSH Server license file):
# cp path/to/tectia-server-license.dat /etc/ssh2/licenses/ -
To configure Tectia SSH Server for Key Manager agent connectivity, deploy the sample Tectia SSH Server configuration (provided with the installation package):
# cp ssh-tectia-server/ssh-server-config.xml /etc/ssh2/ssh-server-config.xml -
Optional: As a security precaution, we recommend dedicating Tectia SSH Server exclusively to handling Key Manager agent connections. When Tectia SSH Server is dedicated to handling Key Manager agent connections, you can configure Tectia SSH Server to disallow ssh access for root and other privileged users. Because Key Manager agents always authenticate to Key Manager Servers using public-key authentication, other authentication methods on Tectia SSH Server can be disabled.
After Tectia SSH Server has been dedicated to handling Key Manager agent connections, you can use the OpenSSH server (configured previously, in Section OpenSSH Server Configuration) for tasks that require remote access.
cautionMake sure that you are able to maintain root access to the machine before performing this step. To verify this, test that you can connect to the OpenSSH server as root before making further configurations to Tectia SSH Server.
To disable access for root and other privileged users, find the following rule block in the Tectia SSH
Server configuration file /etc/ssh2/ssh-server-config.xml:
<!-- Rule for privileged (uid 0) users -->
<rule idle-timeout="0" group="privileged-users">
    <environment allowed-case-sensitive="TERM,PATH,TZ,LANG,LC_*" />
    <terminal action="allow" />
    <command action="allow" />
    <subsystem type="sftp" application="sft-server-g3" action="allow" />
    <tunnel-agent action="allow" />
    <tunnel-x11 action="allow" />
    <tunnel-local action="allow" />
    <tunnel-remote action="allow" />
</rule>
Comment out the rule to disable ssh access for root and privileged users:
<!-- Rule for privileged (uid 0) users -->
<!--
<rule idle-timeout="0" group="privileged-users">
    <environment allowed-case-sensitive="TERM,PATH,TZ,LANG,LC_*" />
    <terminal action="allow" />
    <command action="allow" />
    <subsystem type="sftp" application="sft-server-g3" action="allow" />
    <tunnel-agent action="allow" />
    <tunnel-x11 action="allow" />
    <tunnel-local action="allow" />
    <tunnel-remote action="allow" />
</rule>
-->
To disable all authentication methods except public-key authentication, find the authentication block from the Tectia SSH Server configuration file:
<authentication name="authentication">
    <auth-publickey />
    <auth-password />
    <auth-keyboard-interactive />
</authentication>
Change the authentication block into the following:
<authentication name="authentication">
    <auth-publickey />
</authentication>
Save the changes to the file.
- Restart Tectia SSH Server to complete its setup:
# service ssh-server-g3 restart
Setting Up Key Manager
-
Download the GPG key for the sshmgr package (if you have not done so already). You can obtain the GPG key from the Customer Download Center at https://my.ssh.com
Verify the fingerprint of the GPG key (replace
/path/to/ukm.keywith the path to which the GPG key was saved).On Red Hat 8.x - 9.x / Rocky Linux 8.4 - 9.x:
gpg --import --import-options show-only path/to/ukm.keyEnsure that the fingerprint matches the following:
C77E 88FF B997 7359 68A8 8200 5452 59B7 3F88 EC22Then import the GPG key:
# rpm --import /path/to/ukm.key -
The
supervisordprocess manager must be running when Key Manager Server software is installed. Ensure thatsupervisordis running with the following command:# service supervisord statusStart
supervisordif it is not already running:# service supervisord startYou can now proceed to installing the
sshmgrrpm package. -
Install the
sshmgrrpm package:# yum install sshmgr-7.0.0-*.x86_64.rpmnoteOn Rocky Linux, newly created accounts have no password, and are locked. To unlock the
sshmgruser, you must assign a password to the account. -
For evaluation installations only: The Key Manager installation package provides utilities for conveniently setting up a local PostgreSQL database. If you are planning to use the provided utilities for setting up a local PostgreSQL database, you should run the utilities now. Usage instructions for these utilities are provided in Setting Up a Local PostgreSQL Database for Key Manager Use. these For Rocky Linux and RHEL 9.x you will need to install the local PostgreSQL database using the instructions provided in Local PostgreSQL Database Setup for Rocky Linux 8.4-9.x and Red Hat 9.x
cautionYou should only use a local database for evaluation installations. For production use, we strongly recommend that you use a remote database instead.
-
For environments using Oracle database: The Oracle client requires setting up a timezone file for connections to function properly. Without this step Key Manager will fail to connect to the database.
Acquire the Oracle timezone file from your database Admnistrator. On the Oracle server you can find out which timezone file is being used by running the SQL commands in the following example:
SQL> select *from v$timezone_file;FILENAME VERSION CON_IDtimezlrg_32.dat 32 0You can get this file from the database server in
ORACLE_HOME/oracore/zoneinfo.Copy the timezone file to all Key Manager servers in
/opt/sshmgr/.runtime/lib/oracore/zoneinfo/directory. The oracore directory, and directories and files under it need to be owned and readable by user sshmgr:tectia. Key Manager will use the timezone file with the largest number in the filename from this directory. -
Run the Key Manager setup script. If using a database other than Oracle RAC, the command is:
- If using a PostgreSQL database, or Oracle database with SID, run:
# /opt/sshmgr/bin/ssh-mgr-setup
- If using Oracle database with service name instead of SID, run the setup script with service-name
# /opt/sshmgr/bin/ssh-mgr-setup --install-dir=/opt/sshmgr --db-type=Oracle \--fqdn=keymanager.example.com --superuser-password=example-password \--db-name='(DESCRIPTION = (FAILOVER=on)(LOAD_BALANCE=off)(TRANSPORT_CONNECT_TIMEOUT=5)(CONNECT_TIMEOUT=5)(RETRY_COUNT=10)(ADDRESS_LIST = (ADDRESS = (PROTOCOL = TCP)(HOST = oraclerac1.example.com)(PORT = 1521)) (ADDRESS = (PROTOCOL = TCP)(HOST = oraclerac2.example.com)(PORT = 1521)))(CONNECT_DATA = (SERVER = DEDICATED)(SERVICE_NAME = oracleracdb)))' \--db-user=database_username --db-user-password=example-password \--encryption-passphrase=example_passphrase --accept-eula
The setup prompts the user for the following information:
-
Whether this is a primary installation. Choose yes if the current machine is the first Key Manager Server you are setting up for the current Key Manager system (this initializes the database specified in later settings). Otherwise, choose no.
-
The Fully Qualified Domain Name (FQDN) of the current machine.
-
A non-empty passphrase that is used for encrypting the information stored in the Key Manager Database. All the Key Manager Servers that belong to the same Key Manager system must be specified with the same passphrase.
-
The type of the database that is to be used (Oracle or PostgreSQL). Use the arrow keys to navigate to the desired database type, then select that database type by pressing space.
-
Specify whether the Key Manager Database runs locally. When choosing to use a remote database (recommended for production setups), the setup script will additionally ask you for:
-
The FQDN of the remote database server.
-
The port through which the Key Manager Server connects to the remote database.
-
Whether you use certificate-based authentication for connecting to the database.
-
The name of the empty database (PostgreSQL) or the System identifier (Oracle) you created for the Key Manager system.
-
The user name and the password of the user who has full rights to the specified database.
-
-
The password for the superuser account that can be used to access the Key Manager system (for example, via the GUI).
- If using a PostgreSQL database, or Oracle database with SID, run:
Setting Up GUI and API services (Front End Only)
Key Manager front ends use a Nginx web server to serve the Key Manager GUI and API over HTTPS. The following configurations must be made to enable these services.
-
Allow incoming connections to 443 and restart your firewall service. This is to allow Key Manager GUI requests, which are served over HTTPS on port 443. Run the following on the Key Manager front end servers:
# firewall-cmd --add-service=https --permanent# firewall-cmd --reload -
If SELinux is enabled, configure SELinux to allow HTTP scripts and modules to initiate connections to networks and remote ports:
# /usr/sbin/setsebool httpd_can_network_connect true -
Configure the Nginx Web Server:
# /opt/sshmgr/bin/setup-nginxsetup-nginxautomatically sets up self-signed certificates for serving the GUI over TLS. In production environments, we strongly recommend that you use trusted certificates, instead of self-signed ones. -
This step describes the additional procedures required for setting up trusted certificates. If you plan to use the self-signed certificates created by setup-nginx instead, you can skip this step. In order to set up trusted certificates, you must first have obtained these from your CA (as described in Obtaining Trusted Certificates).
By default, the Key Manager site-configuration specifies the following locations for the certificate files:
-
Server-private-key file:
/etc/pki/tls/private/ukmserver.key -
Server-certificate file:
/etc/pki/tls/certs/ukmserver.crt -
Client-CA-certificate file:
/etc/pki/tls/certs/ukmca.crt
i. The server-private-key file must contain the server private key.
ii. The server-certificate file must contain the server certificate. Also, the certificate chain of the server-certificate CA must be concatenated to this file. Note that the resulting server-certificate file must begin with the server certificate (certificates from the certificate chain can be in any order).
iii.The Client-CA-certificate file must contain the certificate chain of the client-certificate CA. If client certificates are issued by the same CA that issued the server certificate, you can simply copy the certificate chain of the CA that issued the server certificate into this file (certificates from the certificate chain can be in any order).
iv. If you are using certificates issued by intermediate CAs, ensure that the Nginx web browser supports longer certificate chains. To do this, specify the
ssl_verify_depthsetting in the Nginx- configuration file/etc/nginx/sites-available/sshmgr.From the Nginx-configuration file, find the code block that looks like the following:
server {listen 443 ssl default_server;server_name _;# Server certificatessl_certificate /etc/pki/tls/certs/ukmserver.crt;# Server private keyssl_certificate_key /etc/pki/tls/private/ukmserver.key;# CA used for signing api client certificatesssl_client_certificate /etc/pki/tls/certs/ukmca.crt;...}Specify
ssl_verify_depthwith a value equal to or greater than the length of the certificate chains, for example:server {listen 443 ssl default_server;server_name _;# Server certificatessl_certificate /etc/pki/tls/certs/ukmserver.crt;# Server private keyssl_certificate_key /etc/pki/tls/private/ukmserver.key;# CA used for signing api client certificatesssl_client_certificate /etc/pki/tls/certs/ukmca.crt;ssl_verify_depth 5;...}v. Restart the Nginx service to reload certificates and to apply any configuration changes:
# service nginx restartIf you need additional information about configuring HTTPS servers with Nginx, please refer to the Nginx product documentation.
vi. Optional: You can display information about server certificates using the
openssl s_clientcommand (replacekeymanager.example.comwith the address of the Key Manager server):# openssl s_client -showcerts -connect keymanager.example.com:443 -
-
To improve GUI performance under high load, enable the reuse of TIME-WAIT sockets. To do this, set
tcp_tw_reusein/etc/sysctl.confby adding the following line to the file:net.ipv4.tcp_tw_reuse=1Save your changes to the file. Then, apply the updated sysctl settings by running:
# sysctl -pNginx is now ready to serve the GUI and the API.
-
Start the front-end services:
# supervisorctl start frontend: graphupdate redisYou may verify the services' status with:
# supervisorctl statusEnsure that the front-end-related Key Manager services are running:
frontend:api-executor RUNNINGfrontend:graphfrontend RUNNINGfrontend RUNNINGgraphupdate RUNNINGredis RUNNINGOther services may be in FATAL state, but this does not impact functionality.
In case of errors, you can get more information from a service with (replace
service_namewith the name of a service):# supervisorctl tail service_nameExample commands and expected output:
# supervisorctl tail frontend=== frontend started 2020-04-23T14:12:06+0300 ===[2020-04-23 11:12:10 +0000] [37970] [INFO] Starting gunicorn 20.0.4[2020-04-23 11:12:10 +0000] [37970] [INFO] Listening at: http://127.0.0.1:8000[2020-04-23 11:12:10 +0000] [37970] [INFO] Using worker: sync[2020-04-23 11:12:10 +0000] [38024] [INFO] Booting worker with pid: 38024[2020-04-23 11:12:10 +0000] [38025] [INFO] Booting worker with pid: 38025# supervisorctl tail frontend:api-executor-------------- celery@ukm-rpm-postgresql-150 v4.2.1 (windowlicker) ----**** -------- * *** * -- Linux-3.10.0-957.27.2.el7.x86_64-x86_64-with-centos-7.6.1810...-- * - **** ---- ** ---------- [config]- ** ---------- .> app: msg_queue:0x7f3516387ef0- ** ---------- .> transport: redis://127.0.0.1:6379//- ** ---------- .> results: redis://127.0.0.1:6379/- *** --- * --- .> concurrency: 1 (prefork)-- ******* ---- .> task events: OFF (enable -E to monitor tasks in this worker)--- ***** ------------------- [queues].> celery exchange=celery(direct) key=celery=== celery started 2020-01-22T10:16:37-0500 ===# supervisorctl tail redis...38663:M 23 Apr 2020 14:14:22.449 * DB loaded from disk: 0.040 seconds38663:M 23 Apr 2020 14:14:22.449 * Ready to accept connections38663:M 23 Apr 2020 14:14:22.449 * The server is now ready to acceptconnections at /var/run/sshmgr-redis/redis.sock
Import the PrivX Key Manager Software License
To enable key-management features, you need to import a Key Manager license that is valid for your Key Manager version.
Key Manager licenses apply to the entire Key Manager deployment. Therefore, it is enough to import your license once after setting up your first Key Manager front end. The license does not need to be imported again when adding additional Key Manager Servers to the deployment.
In case of multiple license files, Key Manager will read the one added last.
To import your Key Manager license:
-
Access the Key Manager GUI using a web browser. The Key Manager GUI is located in the HTTPS address of your Key Manager front end. For example, if the address of your Key Manager front end is
keymanager.example.com, the GUI is located athttps://keymanager.example.com. -
Log in to the Key Manager GUI. To accomplish this, you can use the superuser account.

-
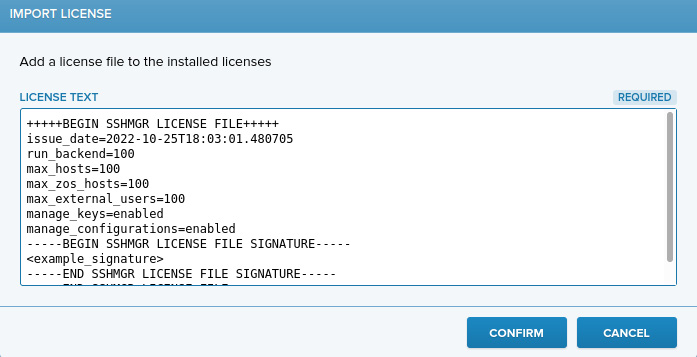
Go to the Settings→Licenses page, and click Import License.
-
In the Import License dialogue, paste the contents of your license file to License text, then click Confirm.
-
For the new license to take effect, you must restart the frontend: service on all Key Manager front ends:
# supervisorctl restart frontend:
You have now imported your license to Key Manager, which enables all the key-management features specified by your license.
Start the Back-End services (Back End Only)
-
Key Manager back end services log back-end events to syslog. For this reason, the syslog daemon must be running before the back-end services can be started.
Ensure that the syslog daemon is running. Start the syslog daemon if necessary..
-
Start the back-end services:
# supervisorctl start backend: redisYou may verify the services' status with:
# supervisorctl statusEnsure that the back-end-related Key Manager services are running:
backend RUNNINGbackend:host-executor RUNNINGredis RUNNINGOther services may be in FATAL state, but this does not impact functionality.
In case of errors, you can get more information from a service with (replace
service_namewith the name of a service):# supervisorctl tail service_nameExample commands and expected output:
# supervisorctl tail backend=== backend started 2020-04-23T14:16:48+0300 ===# supervisorctl tail backend:host-executor-------------- hiscelery@ukm-rpm-postgresql-150 v4.2.1 (windowlicker)---- **** -------- * *** * -- Linux-3.10.0-957.27.2.el7.x86_64-x86_64-with-centos-7.6.1810...-- * - **** ---- ** ---------- [config]- ** ---------- .> app: __main__:0x7f4b3b0ced68- ** ---------- .> transport: redis://127.0.0.1:6379//- ** ---------- .> results: redis://127.0.0.1:6379/- *** --- * --- .> concurrency: 1 (prefork)-- ******* ---- .> task events: OFF (enable -E to monitor tasks in this worker)--- ***** ------------------- [queues].> his exchange=his(direct) key=his# supervisorctl tail redis...38663:M 23 Apr 2020 14:14:22.449 * DB loaded from disk: 0.040 seconds38663:M 23 Apr 2020 14:14:22.449 * Ready to accept connections38663:M 23 Apr 2020 14:14:22.449 * The server is now ready to acceptconnections at /var/run/sshmgr-redis/redis.sock
The Key Manager Server is now set up and ready for use.
Enforcing Key Manager Server Roles
A Key Manager Server can act as a front end, a back end, or as both. When using Key Manager Servers that only perform one of the two roles (as is recommended for production environments), you should ensure that the Key Manager Server roles are set according to the function the server machine is expected to perform. This will prevent Key Manager from delegating requests/jobs to the Key Manager Servers that are unable to handle them.
By default, both the front-end and the back-end roles are enabled on all Key Manager Servers.
To change the roles, perform the following:
-
Gain root terminal access to the Key Manager Server
-
Use the Key Manager controller with either
--enable-server-roleor--disable-server-roleto enable or disable specific roles.The following commands can be used for enabling/disabling the back-end role:
# /opt/sshmgr/bin/ssh-mgr-controller --enable-server-role=backend# /opt/sshmgr/bin/ssh-mgr-controller --disable-server-role=backendSimilarly, to enable/disable the front-end role:
# /opt/sshmgr/bin/ssh-mgr-controller --enable-server-role=frontend# /opt/sshmgr/bin/ssh-mgr-controller --disable-server-role=frontend -
Changing Key Manager Server roles only affects what services may be henceforth started on the Key Manager Server. Note that the operation does not affect currently-running services. After enabling or disabling a server role, you need to manually start or stop the corresponding Key Manager service. The backend: service is started or stopped using the following commands:
# supervisorctl start backend:# supervisorctl stop backend:Similarly, to start or stop the frontend: service:
# supervisorctl start frontend:# supervisorctl stop frontend: -
Optional: Verify the roles of the current Key Manager Server using the following command:
# /opt/sshmgr/bin/ssh-mgr-controller --show-server-rolesYou may also verify that the Key Manager services were running and stopped accordingly:
# supervisorctl status